
by melissa

Five years ago, my husband Jon and I were on a slow, diligent, 6-month hunt for the perfect DSLR, even though we hardly knew what qualified a DSLR to be perfect. Our first baby would be joining our family in the fall, and we wanted to be able to document everything about him—and document it well. We're both visual people with a pinch of creativity, and we were enamored with the thought of having awesome pictures. We'd maxed out our point-and-shoot, we were constantly drooling over the gorgeous photos of professionals, and we had so determined to learn how to take them ourselves, having no idea how big the learning curve would be. So with high hopes, we finally made a decision and took the plunge. Despite my hesitation to move on from the convenience of a pocket camera, Jon knew we would love it, and I was surprised how quickly I realized he was right. (And luckily phones have now fulfilled the need for a pocket camera :) We saw a huge difference from our point-and-shoot when taking photos outside, but the hurdle we hadn't even thought of was taking good photos inside the new place we had just moved into—a cozy little basement apartment.
Not only was our baby boy on his way, I was also about to quit my full-time job to stay at home all day, and fall and winter were looming just around the corner; meaning we were about to spend a LOT of time indoors. A very low-lit, nearly-sunlightless indoors at that. And this was the infamous winter of Snowmaggedon and Snowpocalypse in DC, which meant many snow days cooped up in our little cave with the new babe (yes, the snow totally covered our little basement windows).
For months we felt our pictures inside weren't quite right and didn't turn out the way we wanted (by far). So we devoured photography books, endless professional blogs, and online lessons to un-stump ourselves, and it was like magic when we finally found out how to fix them. The basement apartment was hardly ideal for wannabe budding photographers, but thanks to that little apartment, we got a crash course in low lighting and indoor lighting that made the biggest difference ever.
From our own cabin fever experience, here are the most important things we learned about taking awesome photos inside (that we actually loved).
1. Adjust your white balance
If I could tell everyone just one thing about indoor photography, this would be it. White balance. It will change your life (it totally changed ours). We lived through months of orange basement photos and random blue photos thanks to "auto white balance," and I'm here to tell you there's a cure! Little did we know it would be so easy. To simplify WB, just know that it is the coloring of the light. Different light sources come with different colors or temperatures. Our eyes are awesome and can adjust to the different hue of light each light source provides, but digital cameras can't do that on their own. You want to adjust white balance to get the colors in your images as accurate as possible. For example, the coloring of shade is much cooler than sunlight, but light bulbs inside the house are much warmer than sunlight. Because of the change of coloring, you need to adjust your WB to compensate. Auto white balance (AWB) does an okay job, especially outside with the sun, where your camera can guess coloring pretty well. But low light and mixed indoor lighting throws it off, and you may have found you'd like a little more (or a LOT more) control to avoid those bluish or orangey-reddish pics you're getting (like what we got for months!!). Adjusting your own WB will make the most obvious difference indoors at night, but it's always better than auto. There are almost always presets on a DSLR, which are displayed as icons you can choose from to match your lighting:For clarification, Tungsten is your basic yellowish household light bulb. Fluorescent lights make you feel like you're walking through Target (think bright neon-like white). Everything else is pretty self explanatory. So for cooler light (cloudy day, shade, indoors in the day without lights on) you’ll tell the camera to warm things up, and in warm light (indoor lights/tungsten) you’ll tell it to cool down. Or just pick the WB icon that matches your light :)

2. Lose the flash
I have to confess...with the exception of big fancy weddings we shot, I (we) have never used a flash. Even with our point and shoot. Granted we've probably ruined a lot of shots that way, and when we finally had to suck it up and learn how to use our external flashes for receptions, we hit a learning curve the size of China. And I'll admit, there is a time and a place for flash. Large events in the dark being a good example. But (I could totally be going out on a social limb here) I'm a believer that inside our house we can all take great photos without it. We can also take a lot of not-so-great photos without it, but that's what the delete button is for :) And my guess is that even then, you will not regret having ditched your flash. Our goal with photos is to make them authentic, and flash will sadly take your moment and flatten all the depth right out of it. It removes soft shadows that show definition and replaces it with harsh shadows that are super distracting. Work with the real light you have and learn everything you can about your camera so you can adjust it to make your shot light enough without flash (look for more posts on the best ways to do that in the future).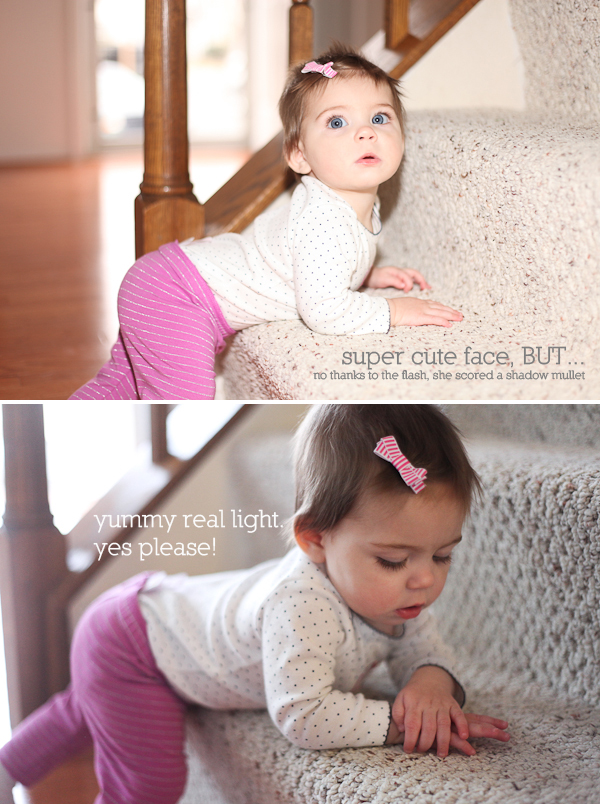
3. Use your biggest aperture
Another confession (all the sudden it feels like I have a lot of things to confess)...I am addicted to large apertures. Huge, open, suck-in-every-speck-of-light apertures. A depth of field that turns everything into a watery blur (except the tiny point I focused on) makes me melt. This is to a fault, and I stick to it even against Jon's better judgment in family sessions or group shots. I seriously can't help myself. Good thing he's my other half on a shoot so he can be getting the people I've blurred away! But I digress. Aperture. This is hard for me to even mention without going into more detail (so it's a good thing I got to go into all sorts of detail here), but for now, know that your aperture is the size of the opening on your lens. The bigger the opening of your lens, the more light you will let in, and the more background you will blur out. Both of these things are the best news ever for indoor shots. You need light, and you want the busy background to melt away. Try switching to Aperture Priority setting ("Av" for Canon and "A" for Nikon) and get your aperture to the smallest number possible (they're fractions, the smaller the number, the larger the opening). That's a good start. (If you're ready to up your aperture game, head over to my Exposure Made Easy Part I: Aperture to learn more, or check out Lenses: What You Want to Know to find out which lenses will get you the biggest apertures for the best price.) |
| Bonus tip...avoid doing a "photoshoot" of your 4-year-old lasting longer than 5 minutes, especially if you are telling him exactly where to sit and which way to look, like I did for this post. He will very likely be unimpressed and bugged like mine above :) |
4. Clean up the clutter
As a family of five, we've always got some form of a tornado running through our house, so a constant mess is inevitable. But we have a little secret. Jon and I like to practice the idea of quickly cleaning up the background of any shot before we take it. This doesn't mean sweeping and vacuuming or putting everything away on their proper shelf. We would miss the moment we wanted to capture if we did that. Let's call it the 10 Second Sweep. We do a quick scan of the scene, and if anything is distracting from what we want our focus to be on, we just move it away so that it's out of the shot. Literally, like to the side of the couch. Or to the opposite wall. It's fake cleaning. And it works like a charm. We do it all the time :) I'm all about being real, but if I'm taking a photo that I may potentially frame on my wall, or send off to grandparents, or if I just want to make myself feel better, it's worth a fake cleaning. 10 seconds. No big deal.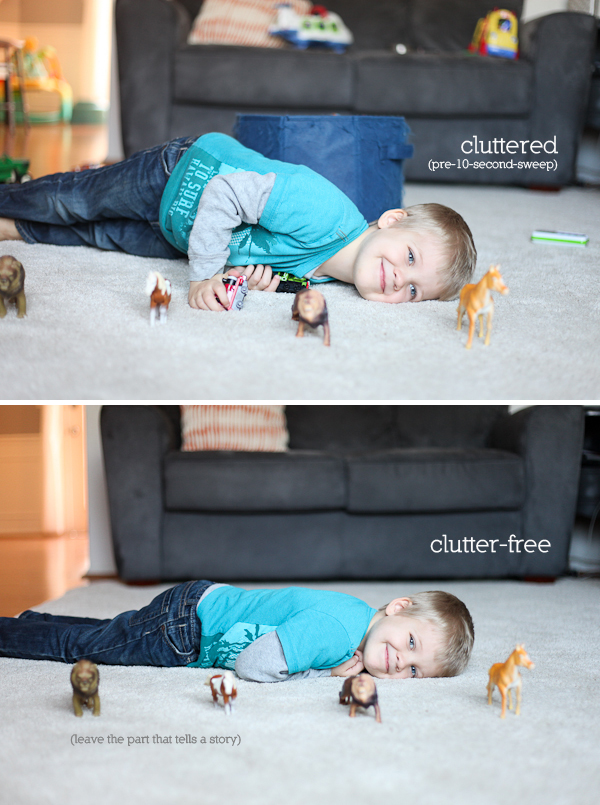
5. Look for catchlights
A catchlight is when indirect light fills your subjects eyes and lights them up. We're pretty hooked on them, they have an awesome way of bringing the eyes—and entire face—to life. To know if you’re getting a good catchlight, look for the source of light reflecting in your subject’s eyes, and notice how much the eyes light up compared to a direct light or backlit photo. We're secretly crazy about backlighting, but we've noticed most clients prefer a radiant face to a radiant halo of glowing hair at the top of their head. Weird, I know. That said, even as a lover of backlighting, when I'm shooting indoors I am a sucker for catchlights, and I'll always choose indirect light in the eyes over the hazy background and darker face you get with backlight. You can get awesome catchlights with indoor window light during the day by having your subject look toward the window. Try it...you'll fall in love with it.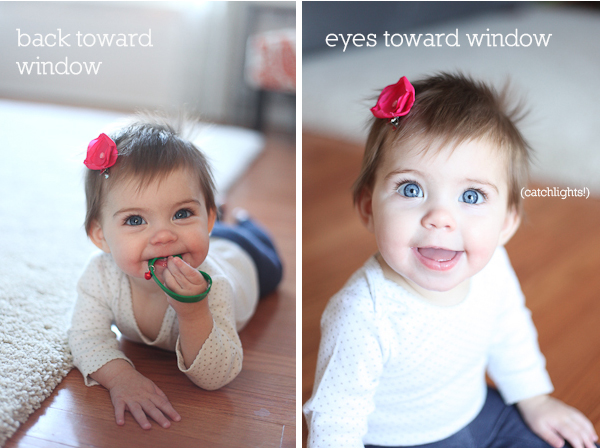
BONUS
There are routine ways to make your camera let the maximum amount of light in, and each of these will require their own post at some point, but in the meantime, here are some numbers you should know to give you a starting point when you're hurting for light: You want to adjust your aperture first (make it as large as possible), your shutter speed second (no slower than 1/80th of a second to keep from blurring), and your ISO last (anything above 800 is usually too grainy and may have poor color quality). If you're still not getting enough light or you have a lot of blur, we'll need to start talking about getting a new lens. And we'll definitely be doing that sometime soon.Let me know if you have any questions, I'm an open book!
What about you? Have you found anything that helps you with your indoor photos? Or any specific challenges?
If you have a question about lenses, you may want to read Lenses: What You Want to Know.

You are so good at explaining this stuff! Your kids are adorable as always!
ReplyDeleteThanks Meg! I'm glad it made sense to you, you're sweet! We miss your kids around here!
DeleteI was wondering what do you use for picture style? There is S P L N F M 1 2 3. And what do they all mean and do.. :) Love all of your information so helpful!
DeleteHi Shannon! I just saw this since it was hidden in a reply! :) Great question...it has a pretty long explanation, and honestly they don't make a HUGE difference, at least not that we've noticed (unless you go into one of them and adjust them to make a huge difference, which we never do). They're presets for levels of Sharpness, Contrast, Saturation, and Color Tone. The letters stand for Standard, Portrait, Landscape, Neutral, Faithful, Monochrome, and Custom settings 1, 2, and 3 (meaning you can set three of your own presets and save them). We typically use Portrait or Standard, but rarely change it. Here's a post on the Digital Photography School that explains it in much more detail: http://digital-photography-school.com/understanding-colour-on-your-digital-camera
DeleteI hope that helps!
Melissa you bring up a great point. It does not matter if you shoot RAW and edit within Lightroom. I believe. This is an awesome post. Thank you.
DeleteBeautiful babies!!!!!
DeleteAwesome! Great tips that I am going to try out! Love this blog!
ReplyDeleteI'm so glad you like them Nancy, thanks so much! We're excited for the blog to, and so happy to get to meet fun, new people through it (like you!) Let me know if the tips work, we'd love to see some of your shots tying the tips out!
Deletetrying*, not tying :)
DeleteAwesome! Great tips I am so excited to try this out! I love this blog!
ReplyDeleteBless you for caring that the rest of us get this right. You really are good at giving the simplified version that the average person needs. Great post, thanks Melissa (and those blue eyes, to die for!).
ReplyDeleteOh my, seriously, had anyone been there when we were learning to "care that we get it right," we could have saved ourselves thousands of bad photos. I'm with you!! The good thing is we can definitely look back on those and see how far we've come! :) Thanks so much for reading, I hope it helps. Let me know if you notice a difference! (and I'm totally a sucker for those blue eyes too...thanks for your sweet compliments!)
DeleteThanks for explaining this. The only problem I'm running into is finding the aperture setting on my camera. I don't have a Canon or Nikon, but was able to find all the other settings you mentioned. Just can't figure out how to adjust the aperture and am thinking maybe my camera doesn't have that feature. The owner's manual sucks, and according to people online it does also, but can't figure it out. Thanks for sharing though! I will use some of these tips for sure.
ReplyDeleteI found it!! :)
DeleteOh good! I'm glad you found it! What kind of camera do you have?
DeleteA Lumix. It's my tide me over until I get a decent camera camera. I don't have a clue how to use it. ;) I love what you guys are doing over here too. Such a cute blog! Catherine is related to me...it's complicated how, but I'll let her explain if she wants. Thanks for your VERY nice comment on my blog. If you guys ever need a guest blogger over here (although it looks like you've got things covered) let me know!
DeleteMeredith
Meredith, anything that can hold any of us over until we get a decent camera is a good thing. For us, it was our point and shoot. We maxed that thing out!!! :) It just makes that step up that much better! :) Thanks so much for your support, we hope it's a fun blog for people to come to. That's fun you're related to Catherine, she's super talented, such an awesome artist. And we'll definitely add you to the guest blogging list! Stay in touch!
DeleteGreat post Melissa! You are so awesome :), and I am loving the pics of you darling babes.
ReplyDeleteThanks Kalli! I think our kids get sick of being models (a.k.a. guinea pigs :) We miss you guys!
DeleteI couldn't love this post more! Absolutely perfect! I'm totally wishing you were my neighbor and could just show me all of this in person but this is the next best thing!!! Thanks so much for sharing.
ReplyDeleteI'm so glad you liked it! I totally prefer to explain things in person, I feel like I can be less boring that way :) Let me know if the tips work! I'd love to see how some photos turn out!
DeleteOr the very best thing: have them take your pictures for you.... heaven. :)
DeleteMelissa! I was about to try this today and my camera battery was dead... go figure :) Tomorrow it is, and look at how much everyone loves your amazing post!
ReplyDeleteAh! That totally happened to me! There was one day I was determined to take the photos for this post, and the battery died in 60 seconds, and the backup was dead. Isn't that how it goes?! Can't wait to see how your photos turn out, post them for us to see!
DeleteDid you see my photo of Peter of facebook? I used your tips and they were awesome. I think i need tips on exposure and lenses though...
DeleteSaw it, LOVED it. So awesome, the lighting looked really good. Exposure is coming up next, that seems to be a common theme that people have questions on. Lenses will be coming right up soon after that. It's hard because they are really all related, but we'll get them all covered soon!
DeleteThanks so much for the great post! I am still having trouble with indoor pictures at nighttime though, what do you suggest for settings to get enough light without a flash? Is it the white balance that makes a lot of difference?
ReplyDeleteThanks Tom, Linds and Emme! I know, indoors at night is the toughest. We've totally been there. A basement apartment is pretty much like indoors at night 24/7. :) White balance will always help, but only with color, not with exposure. If your photos are dark or blurry, that's unrelated to white balance. I have two guesses of may be preventing you from better night shots, each of which I'll be expounding on in future posts. First would be to adjust your exposure settings to get the most "light," and the best way to manipulate those the way you need is in manual mode, especially in tricky lighting like that. Look for a post on exposure soon and I'll explain it in detail. If you've maxed out your settings and you're still not getting the light you need, you definitely want a new lens, and I'll be posting some recommendations for those in the future too. You'll be amazed at the difference those two things will make for you. Email me at doeadeery+mel@gmail.com if you have more questions and I can go into more detail there!
DeleteMelissa, I am ever in awe of you and your talents! thanks for the tips, I can shoot decently when I have good daylight, but fall to pieces when it gets darker indoors. I am still working on it though:) baby steps right!
ReplyDeleteThanks so much Jason for your comment! Try adding more indoor lights...lamps are super helpful, we totally need to add more at our place now. I feel you, inside at night is killer. See my reply comment above for Tom, Linds and Emme. First is WB, (color is crucial!) but for amount of light, it's mostly exposure settings and your lens. I'll be talking more about those in future posts, but feel free to email me at doeadeery+mel@gmail.com if you have more questions in the meantime! And yes, baby steps! That's totally how we learned. And how we keep learning :)
DeleteThese are super helpful hints. I'm going to get my camera right now and try some of them.
ReplyDeleteYour kids are perfect models.
Oh yay! So fun to hear from you Jenn! Get out here soon and you can be my perfect model :) Let me know if the tips work, I'd love to see more pics of your cute kids!
DeleteGreat blog - definitely have a new follower in me!!
ReplyDeleteWhat lens do you use? My favorite is the 18-200mm (Canon) and I have the 50mm 1.8, but I'm not a huge fan of it. Thinking about the 85mm. Thoughts? Also, When do you actually use an external flash? Thinking about adding it to the arsenal, but I'd rather spend the $$ on another lens :)
Becky
Dancing Willow Photography
Thanks Becky! I'm so glad you've joined us on our blog! I'm going to shoot you an email with some thoughts on lenses and an external flash. But definitely also look for the post to come on lenses when I'll go much more into detail!
DeleteThanks! You can reach me at dancingwillowphoto@gmail.com
DeleteNot fair i wanted this info too! I take alot of (and i mean alot of) portrait shots of our daughter, i have the standard 18-55 lens that came with my T2i. What lens do you recommend for indoor/outdoor portrait shooting? And thanks for putting this article together, i love photography and i'm always looking for ways to get better, and you helped!
Deletethank you for sharing, i am also discovering my new dslr camera which i got as well specially expecting my firstborn :) very helpful tips.
ReplyDeleteGala, I know, right!? There's something about a new little life that makes you want really good pictures! I'm so glad you found these tips helpful. Look for more in the future, I hope they'll continue to be helpful posts!
DeleteThank you Melissa. This has been extremely enlightening. I picked up my husband's DSLR last year and have very slowly been learning, and improving. How I've managed to take a years worth of photos without giving the aperture a thought is beyond me, it was totally an Ahhhhh! moment (you'd think hubby might have given me a 101?!) But now I know; aperture first! Thank you!!! I am very much looking forward to practising tomorrow in our dismally dark indoors (after a 10 second sweep of course... though that may take more like 10 minutes!)
ReplyDeleteAsh n Tim, thanks so much for your comment! I TOTALLY get the slow learning/improving process. Who knew, right? And Jon (my husband) totally understood it way before me, even when he tried to teach me it soared over my head. So I definitely understand!
DeleteI'm soooo glad something clicked with aperture for you, it's seriously my favorite thing (more on that in next month's post, I'm dying to write more about it!). I've learned that a camera is like a big machine that has all these parts that need to work together—and all those parts took some serious time for me to "get"! But I'll be posting up pieces of our learning experiences post by post, so come back for more, and hopefully you'll get to continue sharing in some of the biggest ah-ha moments that Jon and I had on our road to understanding our camera. (love that you mentioned the 10-second sweep, and yes, depending on the day and the most recent kid hurricane that has crashed through the house, some days it's more like a 10-minute sweep :) Thanks for stopping by!
Very helpful! Those orangey photos drive me nuts, lol.
ReplyDeleteChris, I know, they're the worst!! It was the greatest moment ever when we discovered WB and how to use it! Good luck!
DeleteThis is fabulous! Thank you for posting this - I found you on Pinterest. I too am hooked on WIDE apertures - they just look too lovely ... I was wondering though, what setting would you use for compact florescent bulb lighting (you know those curly piggy-tailed bulbs that save energy) It's not really a incandescent, but also, not really florescent. We use one that says "Daylight" - but we all know that is a farce.
ReplyDeleteThe other question, do these tips apply to black & white photography too? Your tip about the white balance for example, would that apply to black & whites? I know with a DSLR you're supposed to shoot RAW then convert, but I don't really have the time for that as a mommy of 2 little little ones. So I tend to snap mostly in black & white and just use what comes out - no post editing (other than a little cropping).
Thank you in advance.
Ella! Sorry I'm just getting back to you! I checked out your blog and loved it! (and equally loved Glennon Melton's post on why we don't have to Carpe Diem like you did...LOVE). Thanks so much for reading the post and for your feedback. I'm so happy we share a love for large apertures...nothing makes me happier on my camera than a lens that can do what I want like that :) It is just too lovely, you're absolutely right.
DeleteFor compact fluorescent lighting (I totally know what you're talking about), I'm not sure where it would fall with WB. Have you tried fluorescent and it was too blue? Or still too orange? I love that it's called "daylight"...you could always try your daylight setting and see how it looks, just to humor whoever decided they could print that on your lightbulb box :) I would mess with it until you feel like what you see on your preview screen looks true to what you're seeing in the room. Depending on your camera, you may or may not have an option called "K" within your WB settings, which is actually what we always have our WB set to. K simply means manual WB (it stands for Kelvin), meaning we set it ourselves, which is awesome because we can hit those temperatures that fall in between the WB presets and get our color just the way we want it. If you have a K option, I would suggest giving it a try, especially for the not-incandescent-not-fluorescent lighting that presents a tricky situation. Let me know how that goes...I'm interested to hear what you find out. It makes me want to go buy some of those lightbulbs so I can tell you what I found out too!
As for black and whites, that's a super interesting question. And now that you mention it, I realized I don't think I've ever shot on black and white in the camera, except when we first got it and tested everything for fun. We love our black and whites, but we make ours afterward in Lightroom. (we are not big editing fans, but Lightroom makes it fast, and we keep any changes super simple). We also shoot in JPG, for several reasons (maybe I'll do a post on that sometime), but some of our biggest reasons being the same as yours...time, and the storage it takes. We always shoot JPG (don't tell :) I'm guessing the WB would apply to black and white photos, although I can't say for myself, so there's something I can go do some research on :) Have you noticed the black and whites you shoot straight from you camera seeming like they need a different WB adjusment? What are your thoughts?
Sooooooo helpful !!! Thanks!
ReplyDeleteI'm so glad to hear that! Keep coming back for more!
DeleteAs I sit here on Valentines Day night on Pinterest, I'm happy to have come across this blog. I have recently purchased my first DLSR and begun the learning process. This ties what I have learned so far together nicely. Thanks :-)
ReplyDeletehaha Kelly, happy Valentine's! Pinterest knows how to steal our attention! I'm so glad you came across our blog also. Purchasing our first DSLR came with a huge learning curve too, so I totally know what you're talking about. I'm so happy to hear that it's tying in well with what you've already learned, it's so fun when all the pieces start fitting together and it all starts to make sense! :) Thanks for stopping by, look for more to come!
DeleteI LOVE all of your tips - thanks so much for sharing! I have tried MANY things to avoid the blueish coloring of my indoor photos, but so far not much is working. I have a feeling I need to get a new lens. I have a nikon d5100 and just have the lens that came with the camera (18-55 mm). My living room has pretty low light (the windows face north) so most of my photos have to use the flash. What lens would you recommend? (I want to lower my Aperture and it will only go to 3.5 with my current lens.) Is there a place I could rent a lens and see how it works for me in my home before I purchase one?
ReplyDeleteHi Jen! Thanks for stopping by, I'm so glad you found the tips helpful! So you're still pulling blue...have you double checked your WB? Are you shooting on auto WB? Or have you chosen a preset? Strange that they're blue indoors, unless you have fabulous window light pouring in during the day and you should technically be shooting on cloudy or shade. We actually set our own WB manually by using a Kelvin (K) option that our camera has under WB settings, because then we have better control to get it just the way we want it, but some cameras don't have that option. The best advice I can give is to pay really close attention to what type of light source is lighting the room, and choose your preset accordingly. If you're shooting on tungsten setting but you're close to a fluorescent light, the fluorescent will tint your photos blue. So try to avoid two conflicting light sources, if that makes sense.
DeleteAlso, your hunch about the lens is spot on. Kit lenses just don't cut it in low light (nor will they give you much depth of field). Not only will a lens with a larger aperture give you better depth of field (blur), it will also allow much more light into your camera, which is essential for indoor lighting (especially at night). And honestly, it will give you a little better color. You can definitely rent lenses, we've rented from Penn Camera and love it, but I'm sure you can google "lens rentals" with your city name and other options could come up. I would highly recommend the 50mm 1.8/f lens as the best, least expensive option (we have the 50mm 1.4/f, but the 1.8/f is a few hundred dollars cheaper), and I'll go into all the reasons why on my upcoming lenses post (be sure to look for it!). It's the most versatile starting point and you'll never regret it. It's worth it to get that larger aperture, you'll see a huge difference!
Hi,
ReplyDeleteThank you for this info. Your kids are so adorable! Love them :)
You're so welcome! Thanks for stopping by! and thanks for the sweet compliments on my kids! We think they're pretty cute :)
DeleteHi,
ReplyDeleteThank you for all the tips. Your kids are so adorable! Love them all :)
Hey Melissa I think I am a pretty smart girl, but I am clearly a camera idiot. I tried to figure this out the other day and when I pressed the WB option it kept telling me this option was not available. I decided to sit down and try again this morning...I wondered if it was because I got the prime lens and I was going to ask you. But then the thought occurred...I wonder if this M on the top means manual...voila. I can now change the WB. I know I am smart enough for this...but sometimes when I pick up my camera my heart starts racing and I get flustered. Next time I'll take a deep breath and do some self talk first. :)
ReplyDeleteOkay wait a minute, I just re-read your comment, and realized you were saying when you switched your camera to M, then you could change your WB. For some reason, I at first thought you were saying you couldn't your WB WHILE it was on M, but you could when you were not in M mode. I'm on board now though, got it. :) And that is good to know that one some cameras, you have to be on M to manipulate your WB. Our camera allows us to change WB whenever we want, but that clearly is not always the case. All the more reason to start heading to M exposure :) As a basic rule of thumb though, (in case you don't want to have to switch into M for every single WB change), typically auto WB works great for your basic camera uses (sunny, cloudy, shady) and your shots should turn out just fine without any WB setting changes. It's when you come indoors and depend on artificial light (esPECIALLY tungsten, auto WB will next to never nail tungsten) that you really need to adjust your WB on your own. Let me know if you have questions!
DeleteAnd definitely do some self talk. :) You crack me up. You need to do a guest post here sometime!
DeleteFound you through pinterest. Great post!
ReplyDeleteThanks!
Greetings from Hamburg, Germany!
Thanks so much! Glad to have you here, and I'm so glad you found the post helpful. Be sure to stop by for more!
DeleteGreat information here! I love you put it in terms most of us can understand! I've already tried some of your tips, and it really helped! Although my camera doesn't seem to have a way to set the aperture - or I haven't found it yet. When I do, I am going to try that tip out for sure! Thanks so much!!!!!!
ReplyDeleteHi Terah! I'm so glad the post was understandable, that's what I was always looking for when I was first learning (still am)...something that just made sense!! If you have your camera's manual, I would definitely suggest cracking it open and referencing it to find how to set your aperture. If you don't have it, chances are high you can google it (your camera make and model, and "how to set aperture") and I bet google will come through for you! :) Good luck! (what type of camera do you have, by the way?)
DeleteHi, love your tips thank you so much. i just have a problem i have a canon but i dont know where the aperture is. could you help me please.
ReplyDeleteHi, thanks for stopping by! Where you set your aperture will be different for every camera model (not even all Canons are just the same). First I would suggest looking through your camera manual (if you have it), and it will definitely address where to find the aperture setting. If you don't have your manual, I would try googling your camera make and model and "how to set aperture" and hopefully something will come up. It will definitely be one of the main settings viewable on your LCD screen. Look for a smaller number (most likely between 2.0 and 16.0) It will always have a decimal between two numbers. You may have to hold down a button and turn the dial on the back, but I can't say for sure without seeing your manual and holding your camera. :) Let me know if you've had no luck with the manual or google!
DeleteGosh you've seriously got it down. All the aperture talk and whatnot was finally easy enough to understand! Thank you and our husband for this blog. I do have a question though! What lens do you and your husband prefer? Which lens works best with your portrait type shots for children?
ReplyDeleteHi Kyle Rose! You're so sweet! I'm so happy you stopped by and commented! We have several lenses, but our 50mm has always been our go-to. We paid more upfront for our 50mm 1.4 when we first got our camera, and it was definitely worth it! The 85mm is also beautiful, but more zoomed in, which is great for capturing kids outdoors, but harder when you're inside because there's not much space anyway, and it's difficult to get far enough away from them to get them in the shot. But definitely do-able. My post next week will be on lenses and I'll share some more thoughts & tips! Look for it!
DeleteThis may sound dumb... How do I subscribe to your blog? Lol.
ReplyDeleteHaha, I believe you can either "join it" by clicking on the blue google "Join this site" button at the top right of the blog page (on the right sidebar) and become a member, or you can add Doe A Deery to your RSS feed (i.e., google reader, or whatever you use) by clicking on the RSS icon at the top of the blog page in the left sidebar (it's the 4th icon, you'll see a facebook icon, pinterest, instagram, and then the one that looks like a diagonal rainbow, that's the RSS icon), then choosing which reader you use in the window that opens, and you'll be subscribed. Email me if you have any problems with that!
DeleteThis was a really good tutorial!! I've been wondering this for a while! I'm so glad I found this :)
ReplyDeleteNew follower!!
xoxo,
Kiana
kianabates.blogspot.com
Thanks so much Kiana! We're happy to have you join us! Look for my lenses post next week!
DeleteThanks for these great suggestions. I wish this was coming easier to me, however I am still having a hard time getting my photos to not be blurry when I take them inside. I've figured out the WB and think I understand that now. But the blurryness is killing me!
ReplyDeleteI decided to go out on a limb on Christmas morning and try to take all my photos on Manual with a high ISO,high Apperture, correct WB and no flash! Unfortunately 90% of my photos came out blurry and I'm so disappointed. I know that doesn't have to do with the WB, but it was so frustrating to see them all turn out so blurry. I'm guessing it was my shutter speed, but I couldn't make it any faster w/o my flash with my 2 and 6 year old :(
I definitely need to pull my camera out more and mess around with it, but if you have any suggestions I would greatly appreciate it. I have a 50MM 1.8 which I like somewhat but it's so close up that I have a hard time capturing the whole scene instead of just the up close face which I also love at times! The other is a kit lense that I use most of the time simply because it captures the entire shot. I would love to upgrade to a better lense that does better inside with less light, but I'm not sure what that is without spending thousands.
Thanks for the insights & I've now started subscribing!
Becca
Becca, thanks so much for stopping by, and thank you for your comment! First of all, way to go jumping into manual! It's a lot to swallow at first, but in the long run it gives you much more flexibility to get the shots you want (and I loved finally understanding what was going on in each shot to make it work or not work).
DeleteI know where you're coming from with the blur. I have a couple thoughts on that. Shutter speed should definitely not be a problem. How high does your ISO go? 1600? If it's that high, that's as high as most entry level cameras can go (although you'll definitely lose quality if you're shooting with it that high). Try assessing the lighting in your home and seeing if you could add some lamps to help your camera not have to fight so hard for light. That said...we have had both the 50mm 1.8 and the 50mm 1.4. And I can speak by experience when I say you get what you pay for, especially when technology is involved. I've noticed big differences between the two, and it has little to do with the aperture size. It's just the quality of the lens. I'm curious if the "blur" you're experiencing is actually "out of focus."I noticed with the 1.8, I had a horrible time nailing the shot. It just wouldn't lock in the way the 1.4 does, which would make a lot of shots out of focus. When you say blurry, is there actually an action blur? Like you would if someone was jumping, running, or waving their arms? Or is it just not crisp? I'll address why it's so up close with your 50mm, along with any other lens info we've learned, in my post next week. So be sure to look for it, and let me know if you have more questions after the post! I'm afraid the best answer is going to be to invest a couple hundred dollars more and step up your lens quality. But stay tuned next week to see what you think.
What lens do you use? Your pictures are great!
ReplyDeleteThanks so much Addy! Our go-to for indoors is our 50mm 1.4. The 50mm 1.8 will do the job and is much cheaper, but it comes with a couple hiccups (that I will address in my lenses post next week). We also have an 85mm 1.8 that we LOVE, but it's a little too zoomed in to fit much indoors, so we use it inside, just not as much. We have a couple other lenses that we love, and I'll be sharing that info (and anything else we've learned about lenses) in my post next week, so be sure to look for it!
DeleteGreat tutorial! Thanks so much for sharing these tips (and for writing them in a manner in which all levels of photography experience can follow along). I look forward to future posts.
ReplyDeleteThank you for stopping by Mandy! We're so happy to have you here, and I'm so happy it's easy to follow, that's exactly what I wished I would have had when we were first learning! I'll be posting again next week, be sure to stop by again :)
DeleteI have the same problem as Becca. I use my 50mm 1.4 on Aperture priority mode while inside and really open my aperture but I just can't seem to get clear photos, even if I bump up my ISO to 1600. Even taking photos of my children standing by the window never produces clear photos for me. Definitely nothing like the photos above. I am using a Rebel XT, could it be the camera?
ReplyDeleteI'm with you, toon2fab! Check out my response to Becca above. Although you have a 50mm 1.4, so I'm surprised to see you're having the same problem. Confession: even our 50mm 1.4 lenses glitch out on us. The auto focus has gone out on THREE 50mm 1.4 lenses. That's a lot. And we have to replace them every time. It only happens when they're about a year old for us (but we use it NONSTOP). How long have you had yours? Are you trying with autofocus and seeing/hearing your lens move in and out trying to focus and not every nailing it? Or is it being temperamental with focus, sometimes working, sometimes not? Try manually focusing a couple times (it will still beep when something's in focus if you hold the shutter halfway down to let you know you nailed it), and if that works but autofocus doesn't, I'll bet your autofocus went out like ours. If not, then I'm going to have to say it's your camera, because that should never happen consistently if you have enough light (especially by the window!) Check online reviews for your camera and see if others have had similar problems, it would be interesting to see what you find!
Deletehere's a question: What are your tips for using a kit lens that only has an aperature of 3.5 (sad i know). We just bought a dslr w/ the kit lens and can't afford to upgrade to a better lens for about another year. Have any tips for getting great photos with a limited kit lens?
ReplyDeletehere's a question for ya:
ReplyDeleteHow can i get better photos with my kit lens? We just got our dslr w/ the kit lens (18-55mm, f-stop 3.5) and i'm slowly realizing that i can't get that sexy background blur with an aperature that only opens to 3.5 (sad!) Any tips for creating great photos with a limited kit lens?
DANA
Dana Lynn, I love that you said "(sad I know)". :) It is sad, but we had our point and shoot (read: next to no awesome capabilities for photos) for almost two years before we got our beloved camera and lenses, and we made it work! If you're looking for a good background blur with a kit lens, try to have the background further away from the subject in focus. The closer anything is to your focal point, the more in focus it will be. So distance your subject from the couch, the wall, the table, whatever, and it will have a better chance at blurring out, if only a little bit. Do this by bringing your subject closer to you, or try getting closer to your subject. The further away you are from what you're focusing on, the more everything else in your picture will be in focus too. Have lots of lamps inside to add lighting at night so your camera won't have to work so hard to get a decent shot. Photography is nothing without light, and the smaller your aperture, the harder your camera will have to work to get that light. Keep your shots simple. Simplicity always makes a photo feel cleaner, and that's helpful when your aperture is capturing a lot more in your shot. Keep in mind that with a kit lens, the more you zoom out, the more will be in focus (your aperture actually CHANGES as you zoom out and becomes smaller). I'll explain all this more in my lenses post next week, so be sure to watch for it. Thanks so much for asking questions, I hope that helped!
DeleteMelissa - Thanks for these great tips!! I am learning to use my Canon Rebel as I take pics of shelter dogs. I may be asking for help. Thanks a lot!!
ReplyDeleteSusan
I'd love to help anytime Susan! Thanks for stopping by!
DeleteRe-pinned your post via Pinterest and read it today. Great tips! I am like a step above "beginner" level. Like Beginner 1302. Haha. Anyway, I own the basic D3000, but have the Nikkor 50mm 1.8 lens on it. I am off of Auto, and on Manual mode, but was recently told by another photog friend of mine to perfect the A mode first, then S, then head back to M. Sooo....that is what I need to do. I know about natural light, and catch lights. Looveee me some catch lights on my dark-eyed babes. :) Gotta practice the WB and Apeture. I would like to one day be able to take pics of my boys myself and actually have them come out the way I like.
ReplyDeleteThanks again for the tips. Cannot wait to peruse your blog more.
A new fan,
Ashlee Rae xx
Ashlee Rae, thanks so much for your comment! So glad to see we share our love of natural light and catch lights! You will definitely be able to take pictures of your boys yourself, that's the whole reason we got into photography, to take photos of our own family.
DeleteI think everyone learns in their own way, and honestly, I don't think there's any correct order that anyone has to follow to master their camera. What works for you to learn your camera may be totally different that what worked for someone else. We never perfect auto. Never used it. Started on aperture priority and LOVED it, and we took a killer plunge one day into manual and never looked back. (Look for that story in the future, it's a winner :) We hit one heck of a learning curve, but I never would have learned if I would have waited until I perfected other settings on my camera. I think I would have stuck to what was working, and never known what I was missing. Go ahead...challenge yourself! If you want to shoot manual, shoot manual! Do your thing!
So happy to have a new fan :) I can't wait to hear from you more!
Thanks for the tips, my flash broke awhile ago on my camera and it's going to cost $200 to fix so I've been living with taking photos without a flash.
ReplyDeleteBut as you said they have been very yellow, today I played with my white balance today and it made a huge difference. I was taking product shots so I played with what one gave the truest colour - it wasn't the incadescent one but I've never played with the function before.
Thanks
Vone
Vone...awesome!!! I'm so glad to hear WB has helped! Isn't it the best when you find out about it?! Keep trying out those settings, and if you have a "Custom" or "K" option, keep that in mind as a way to get in between the presets that exist. They're all temperatures, and sometimes you need a temperature that isn't among the presets. That's why we custom set every time. But I bet the presets are pretty close! Good luck! So happy to be helpful.
DeleteNice post ... only remarks is the use of the flash (or not to use) ... using flash can be a great asset if you know how. Just use strobist techniques and you can controle the power of flash. See http://www.strobist.com for more infor about strobist (not spam by the way .... I learnt so much about lightning and using flash on the Strobist website)
ReplyDeleteThanks for your comment FransYozef! I completely agree, flash can definitely be a great asset, like you said, if you know how. Strobist techniques can make it lots of fun (we experienced lots of off-camera strobe-light flash at big weddings we shot and we were CRAZY about it. Completely addicted and in love with it. It's a blast). Even in the home, flash can be used {if done wisely} as a fill light, or it can be bounced off ceilings to give that extra light that just doesn't exist indoors. Flash done well does strike me as very professional, perhaps a little less casual than what I imagine many of our readers are looking for (and definitely more setup going on than I can manage while juggling three children in my home on a normal day). All the same, I'm sure many will find your comment and link helpful! Thanks so much for sharing!
DeleteYour information is so helpful. I am now following your blog. I got a new DSLR Canon Rebel for Christmas and while I do have great success outside, the inside pictures leave a lot to be desired. I like to take tablesetting pictures for my blog and have just not been able to get satisfactory pictures with this new camera yet. So, I am thrilled to find your instructions here...it finally makes a little sense to me. I accidently took some tungsten pictures of my 4 month old granddaughter inside a few weeks ago and they turned out really well...DUH! maybe I should try it in my windowless dining room....thanks for your help..can't wait to read your future blogs... come over and visit me sometime...
ReplyDeleteMona
just to give you a heads up... I included a link to this post in my blog about taking pictures this morning.... :-)
Deletehttp://hiddenartofhomemaking.blogspot.com/2013/02/taking-inside-pictures.html
Mona
I went and saw your post Mona, thanks so much for stopping by and sharing the link to my post! I was so happy to see how quickly the tips helped, your china looks beautiful :) Like I said, white balance will change your life! :) It was our favorite discovery. Be sure to stop by next week for my lenses post. And I'll visit your blog too!
DeleteI found you via pinterest. I've had a Sony DSLR for over 2 years, and tonight, I discovered what the Fn button does, thanks to your awesome instruction. The white balance is going to SAVE me! Thanks for the tips.
ReplyDeleteWB is the best discovery, right!? So happy I could help! Come back for lenses tips next week! I'm glad you found us through pinterest and hope to see more of you here. Be sure to let me know if you have any questions, and I'll try to answer them in upcoming posts too!
Deletethanks so much! I have been looking for this info...had to sift thru so many sites and tips and yada yada...this is wicked helpful...got it on a post it already. i got lots of info researched, and just needed quick tips like what you have here, i read all about aperture and white balance and iso-but never found quick starter tips. so this was helpful...got it on a post it on my wall.
ReplyDeleteThanks so much Fran for your comment! It makes me so happy that you found the tips helpful and a quick way get some better photos, that was totally my goal! Thanks for sharing the link, and I hope you'll be back for more posts in the future (look for the lenses post next week!).
DeleteLove those tips - simple and effective! Please post more.
ReplyDeleteThank you so much for your comment Andreas, simple and effective were exactly what I was hoping for, so I'm glad that was reflected. I'll be posting more for sure! Come back next week when I'll be posting on lenses, it seems like a common question coming up among readers.
DeleteI really love your post!
ReplyDeleteI have a Nikon D3100. I own the lens that came with the camera and also one that says 55-200 and I'm trying to learn to shoot in A mode.
I read things and I watch videos and everything seems to make sense to me. However, when I actually go to shoot a picture, they are not good! They're either really dark or quite blurry. I experiment with everything - white balance, the little button with the +/- I cannot remember what this is called but something to do with exposure... and actually that one can help.
But here's the thing. I'm just a mom who wants to take nice pics of the kids. And then sometimes their sports or performances, and then sometimes vacations. Mostly just around the house. And in the house, some rooms are bright and sunny while others are a little dark.
So I want to be able to just pick up the camera and snap with very minimal experimenting. The kids get distracted too easily and don't have the patience to wait around for me to figure things out.
How can I do this while shooting in A so that I can get the shallow depth of field that makes pictures look so nice?
Laney...I'm totally with you. I understand 100% the need to just be quick and effective when children are involved. It's tricky catching crazy little tornadoes in the moment, and even trickier when your camera is not nailing the shot. We don't have our photog business anymore, so catching my kids on the camera is my primary photography concern :) And when three little people are involved, I want it to be easy. You can totally do fast and easy with A (aperture priority mode), but you need to have the lens to stand up to the job, or it's not going to turn out. Your +/- button is your light meter, and that will help like you said. But what it comes down to is the quality of your lens. If you want the shallow depth of field, and you want to take indoor photos of your kids, you need to invest in a better lens that will solve both of those problems. A bigger aperture lets in much more light AND gives you a much shallower depth of field, and the kit lens maxes out shy of those capabilities.
DeleteThis has been a common concern in the comment thread for this post, so I'm going to be addressing lenses in my post next week. Come by on Wednesday and hopefully I'll answer your questions there, and if things still aren't working, please let me know in the comments again or feel free to email me!
I'll look forward to your new post about lenses! If I could ask one more thing....
DeleteWhile I do sometimes have my kit lens on, the other one I have is this one: http://www.amazon.com/Nikon-55-200mm-f4-5-6G-AF-S-Nikkor/dp/B0009HN57Y/ref=sr_1_2?ie=UTF8&qid=1362455491&sr=8-2&keywords=nikon+lens+55-200
Is it not "good?" When I bought my camera used, the guy gave it to us in addition to the kit lens. I guess I assumed since it wasn't the kit lens that it must be decent.
Thank you SO much for your help :)
It's decent...but it's pretty much no different in quality from your average kit lens. Sadly, when looking for speed and light, especially when we're talking about indoor photos, aperture size is a big deal. And lens speed is a big deal. A 4.0-5.6 (which is the aperture on your second lens) is just too small to get the amount of light you need indoors (unless you've got some phenomenal windows, but even then, it's not ideal), and too slow to avoid blur. I wouldn't say it's not a good lens, because it will perform perfectly in certain circumstances, especially outside in the day. But indoor photos probably bring out the worst in your lenses. I'm gathering my thoughts for the post (which may not be until Friday or Monday now, so check back to be sure you don't miss it!), and hopefully I'll answer more questions there!
DeleteYou're so welcome for the help, I'm happy to share!
Thanks so much for your post! I learned something new this morning, we've had a Canon Rebel for a while now and I've never known how to use the thing. This was extremely informative but easy enough for me to grasp while eating breakfast. Now feeling inspired and off to take some photos of my kids! Thanks you again!
ReplyDeletePerfect, that's exactly what I was hoping for this to be...informative and easy :) Thanks for your comment, and be sure to come by again next week for my post on lenses! Good luck with the photos of your kids, let me know how they turn out and if the tips helped!
DeleteThank you! I found this post via Pinterest, and tried it out today and much better photos. I have had my DSLR for about 3 years and am slowly, very slowly, learning to use it properly. :)
ReplyDeleteOh good, Kristin! I'm so happy to hear that you've already had such great results! It's a slow process, it really is. We are creatures of habit, and learning a DSLR requires learning so many new habits (that are not exactly intuitive), so it's okay if it's slow-going :) Be sure to come back next week to learn more about lenses and why they matter!
DeleteI just read your post after finding it on Pinterest- thanks so much! I have a 9 month old baby girl who never seems to sit still now when I'm trying to take her picture. Is there a trick to the settings to take the pictures quickly? I've tried it without the flash but it always seems as though something is blurry or out of focus. I have a basic Canon Xsi Rebel. Thanks!
ReplyDeleteI totally know what you mean, Jenni, my baby is 9 months today! There isn't a trick necessarily, but having a good lens and knowing how to maximize your exposure settings with minimal light are both essential to avoiding blur indoors. For some tips on lenses, check out my new lens post from last Friday: http://doeadeery.blogspot.com/2013/03/lenses-you-want-to-know.html
DeleteI would guess the blur and lack of focus are both problems stemming from your current lens. Blur because if it's a kit lens, it's not fast enough (shutter speed) to stop action. And out of focus because the focus isn't as sharp on entry-level lenses. My favorite recommendation is the 50mm 1.4, but if you're concerned about price, you can go for it's cheaper sister lens, the 50mm 1.8. I feel like the focus isn't as sharp on the 1.8, but it is probably still an improvement from an entry level lens that comes with a camera.
Perfect! :)
ReplyDeleteThanks Sanna!
DeleteYou should rename this post to "taking fab images for dummies!" This helped me tons!
ReplyDelete-Nash
haha! so glad I could be of help Nash!
DeleteOH MY WORD! I have had my camera for a while now, but I never really made the time to learn all the ins and outs. The manual is just ridiculous and I couldn't afford the photography class I'd love to take. I was JUST uploading some pictures yesterday and thinking how I wished the lighting in my house was better! Now it doesn't have to be! Thank you SOOOOOOOOOOOOOOOOOOOOOOOO much for taking the time to post this. I'm embarrassed to admit, I had no idea what that Av setting was even for until now! Thank you, thank you, thank you for putting this into terms even a bonehead like me could understand and for making it short enough that I didn't fall asleep reading it! ;) THANK YOU!
ReplyDeleteMandeeFranee, I'm so happy to hear how helpful the post was! I know what you mean, the manual is totally overwhelming and so hard to understand...it just doesn't speak our language. :) Good luck, and come back for more! My exposure series starts next week! Thanks so much for your comment!
DeleteHAHAHAHA. As I'm reading most of these comments I totally agree! Especially MandeeFranee's. I have been learning more by playing around with the settings. I always had to refer back to the owners manual and that isn't convenient. I just took Easter photos yesterday, or should I say attempted. My best friend and I were trying to get them of 7 kids...all under the age of 9...and 2 chicks [birds not females :)]. We got a few cute ones but the one little guy was BUSY!!!! Lighting was a bit of an issue for a few of them. So this helped explain a bit more what I was trying to do. Thanks...as you've been hearing for quite some time now! I'll have to let my bf know so she can figure out her camera so she can attempt some good ones with her uncooperative bunch :)
ReplyDelete-Teresa W.
Anonymous...I know exactly what you mean. Kids and indoors are both the story of my life right now. Herding multiple children into a "cute picture" is practically impossible when exposure DOES make sense! :) I'm glad I could be helpful, and hopefully there will be more helpful posts to come. Check back in soon, my exposure series starts next week! Keep at it! You'll get it!
DeleteHi! Wow! Great stuff! Love how you explain things. Are you on Facebook? I wanna make sure I don't miss any of your blog posts or whatever! I've been researching lenses for a while now. Looking into the perfect one for low light situations ( wedding receptions and ceremonies.). Is it worth the ton of extraextra money for the 1.2 vs the 1.4 or 1.8?
ReplyDeleteJT Phototgraphy, thank you for stopping by, and thanks for your comment! You can like our Doe A Deery facebook page and you definitely won't miss any posts that way.
DeleteFor low light situations like wedding receptions—which we did a lot of—I would recommend the 1.4 for sure. It definitely beats out the 1.8 (and we've had both, so I've seen the difference firsthand) and is totally worth the slightly extra cost. I haven't had the 1.2, although I've heard it's amazing. We just couldn't cough up the $2,000 for an extra half-stop. :) But when it comes to wedding receptions, we finally had to accept the fact that off camera flash was much better than no flash. This post is directed mostly to photos in the home, but weddings can be much darker, much harder to adjust (since you're not in charge of the "ambiance"), and much more vital to catch the right moments (that is what they're paying you for). We aren't masters at it, but speedlites and pocket wizards have become our friends, and I would highly recommend looking into them where you can online. I won't be addressing any of that here since the typical reader is a much more casual photographer, but there are plenty of good sources that can help you. Try looking up the Digital Photography School for starters, we love them! Feel free to email me if you have any more questions!
Just read the blog on lenses. Opened my eyes a little bit more! I have the a65 Sony camera. I've been using the kit lens, but definitely want a new lens. I've been considering the prime 50mm fixed. But you think the 35mm would be better for my cropped sensor? And still question which f #` the f-1.2, 1.4 or 1.8? Used for indoor children pictures, photo shoots of families and weddings. Such a large aperture, will a it work for taking pictures of the wedding party ( being more people) or will i have to remember to change lenses for the larger groups?
ReplyDeleteFor a cropped sensor, yes, I would say go with the 35mm. As for aperture, I'm not as practiced on a 35mm, and haven't had experience with different apertures to compare, but I would look up forums online comparing the lenses, and usually you can get some really good information that way. The thing people may forget about having a huge aperture is that it can be huge when you want it to be huge (low light) and it can be small when you want it to be small (family photos outside, wedding photos outside, etc). Adjust it for your situation, but you shouldn't often need to go any smaller than a 5.6 for group shots, and definitely not smaller than 8.0. Another lens won't change the ability to get everyone in focus, but if you're concerned about getting them all into the frame of your lens, you could consider having a slightly, wider lens, or just be prepared to "zoom on your feet" and back it up to get everyone in your shot. We tend to use our 50mm for portraits, and the 24-70mm for group shots, only for a little more versatility, not necessarily to fit more in the frame. Let me know if that helps!
DeleteLOVE this post! I may have missed it somewhere but did you mention what kind of camera you use? Your pictures are beautiful. Love the lighting! Thanks for the tips!!
ReplyDeleteHi Casey Fam! I didn't mention my camera in the post. I was planning on doing a "what's in my bag" post sometime in the future, but we have two 5Ds. One has been discontinued and is an original Canon 5D, and the second is the Canon 5D Mark II. They're awesome!! Thanks so much for stopping by and thank you for your kind comment! I'm so glad you found the post helpful!
DeleteBest photography tips I've gotten in a long time! And just in the nick of time-- we're visiting family in La Crosse and having my daughter's birthday party at my mother-in-laws house. Her house doesn't get a whole lot of natural light, so I'm going to have to definitely adjust my WB and use all your other fun tricks from above! Thank you :)
ReplyDeleteChelsea, I'm so glad you enjoyed the tips! WB was our best discovery ever. Good luck at your daughter's birthday party! Come back for more tips in the future!
DeleteThis is so awesome for mommy's and daddy's! Great tips :)
ReplyDeleteThanks anonymous! Enjoy, and come back for more!
DeleteThis is really awesome stuff! Thanks! :)
ReplyDeleteYou're welcome Sharmaine! I'm glad you enjoyed it! Be sure to look for more how to's to come. :)
DeleteI have sony dslr but when I try the apeture it doesn't go below 4.5 is this normal?
ReplyDeleteRosemary, this is because of your lens. That means that's as large as your aperture can get with that lens. Check out my lens post to learn more: http://doeadeery.blogspot.com/2013/03/lenses-you-want-to-know.html
DeleteI hope that helps, let me know if you have any more questions!
Awesome post! Thank you! I found you via pinterest and I'm glad I did.
ReplyDeleteLonden
Thanks, I'm so glad you found me too Sixty-Fifth Avenue! :) Keep coming back!
DeleteThanks Melissa! I have read so many articles on photography...and it is too mathematical. No help at all...but your posts are amazing!!! I've been getting into the photography jive myself lately. So much fun, and your tips are so helpful.
ReplyDeleteThanks so much Steph! Glad I can help! The math is somewhat of a necessary evil for photography, but once it clicks, the numbers are just the means to getting the shot you want, and it all makes much more sense then. But I agree...there are way too many explanations on photography out there that do nothing but go straight over my head! So I'm glad to hear that this was helpful, because I've totally been where you are! Good luck!
DeleteGreat post! I'm into photography but not an advanced study. I love taking pics of people and am always a fan of simple shared ways to improve my shots, such as lighting. A lot of this stuff I already knew about, but it helps to read them as you explained them and put it in context. Lovely pics and beautiful kids!
ReplyDelete~Molly @ crosscountrychronicle.blogspot.com
Thanks for stopping by and for your comment, Molly! I'm glad you found the context helpful, I do so much better with example actually used in real life too :) Consistent shooting is the best way to improve, so it sounds like you're on the right track!
DeleteGood luck!
Great tips and adorable subjects!! Thanks :-)
ReplyDeletehttp://thisfineday.com/
Thanks Becky for stopping by and commenting! I'm so glad you found the tips helpful, be sure to come back and follow my exposure series I'm in the middle of right now, my next post will be in a couple weeks!
DeleteOh My You have BEAUTIFUL children!!!!! Such great explanations. I love the before and after....makes it so much easier to understand
ReplyDeleteoh you're so sweet! Thanks anon! I'm glad the before and after shots helped, I'm a visual person too, so I'm glad that works for you too!
DeleteHi Melissa
ReplyDeleteGreat tips, thanks! I will be spending a lot of time on your blog... I can just see it happening :)
I have a question... Hoping you might be able to help.
I'm doing my first indoor, natural light shoot this coming weekend. I was toying with the idea of bringing in a flash and diffuser, but really not the look we are going for with this shoot. A reflector will be the only enhancer I will be using. It's actually a jewellery lifestyle shoot. I was hoping you might throw a few tips or pointers out that I can think about before we get started?
Loaded question, I know.... but I really want this to be a creative and fun shoot, so I am googling like crazy.... :)
Thanks again for the great blog!
Hi Marcia!
DeleteI'm so glad you stopped by and found some helpful info. For your shoot this weekend, here's what I can come up with offhand. If you have a good lens, you shouldn't need anything more than your camera, but feel free to add the reflector if you're just not getting enough light. Focus a LOT on getting good INDIRECT window light, just light from having a window there, not light streaming in from a window and leaving weird lines. If you have people wearing the jewelry, try to have their face toward the window, even if the body is facing slightly away from it. Look for catchlights and use them to light up your subject. If the jewelry will not be worn by someone during the shoot, you can be more creative with where you place the jewelry to make a good shot, like hanging it from an architectural structure, or being placed on something similar in shape to the jewelry that creates a repeating pattern, or using unique bowls, baskets, fabrics, pretty papers, or anything else on hand to put the jewelry in/on. Most important to keep in mind though, in my opinion, is to keep it simple so the jewelry is what pops in the photo, not anything else going on in the image. Make sure nothing is distracting in the photo, taking the focus away from the jewelry or subject. Think clean, with clean lines, clean backgrounds/foregrounds, and a clean focus. And you definitely want to nail your WB with jewelry, since you want the color to be true to the actual color of the pieces you're showcasing.
I hope this helps, I kind of feel like I just repeated my post in cliff notes, but hopefully there were a couple other things that could be helpful :) Enjoy, and good luck! Make it fun and real and you'll have a good experience!
Thank you for that last point! I forget this oftentimes.
ReplyDeleteOne question I hope you could help me decipher. I have a very light-filled house. We even painted the interior a white color to maximize on the light (deep down inside I was thinking about all the photos I'm about to take inside there). I have a Nikon D7000 and my favorite lens to shoot with is Nikon AF-S 50mm f/1.4G. I don't know if it's my camera backfocusing or what (which I've heard is a common problem with this model) but even when I have a large aperture and shutter speed over 1/125 (sometimes 1/250) I get very soft focus on my girl's eyes when I focus on them. And the weird thing is that once in a blue moon I'll get amazing photos out of this camera, crisp eyes and everything - but more often than not, it's soft focus. Is it the baby's movement that's at fault here or can I tweak something else in my camera to fix this?
You have the 3rd cutest baby girl I have ever seen in my life (I have 2 girls)! WOW!!!!
ReplyDeleteHaha, thanks! We like her a lot :)
DeleteMelissa,
ReplyDeleteYour children are beautiful! Thank you so much for these wonderful and helpful tips! You did an awesome job explaining them! I love photography and always have my little sony camera with me to take pics. I really want to be more professional with my photography and see what I can do with a better camera. What camera would you recommend as a "starter"?
Wonderful tips! I have a Nikon, and I'm trying hard to learn how to shoot in manual. I am having problems trying to adjust the aperture for a blurred background when I'm outside. It always lets in too much light and pictures are nothing but a blob of white light. I've tried adjusting the speed, nothing works. I also have a hard time getting my pictures sharp. I typically don't use a tripod, but my hand can't shake that much?! Is it my lens? Any help will be appreciated! Thank you so much!!
ReplyDeleteKaryn M.
I know that this is an old post, but I just found it (via pinterest) and found it so helpful! I can't wait to experiment more. I have had a DSLR (Canon XS) since I graduated from high school, and have never gotten around to learning to use it like I want to. Now I have a daughter and home and pregnancy that I want to document well and I either don't get it out or end up with blurry, dark photos because I refuse to use the flash. I'm excited to try switching a few things up and learning from more of your blog posts. I just needed something accessible, concise, and unconfusing to get started!
ReplyDeleteWonderful and helpful tutorial. Thank you!
ReplyDeleteAny advice on what would be the best settings to use if I have to take a picture of my kids with a huge picture window behind them? I lose out on so many sweet moments either by going into the room and trying to get another perspective and interrupting the moment or I end up with red eyes, dark bodies and huge glowing white light background. I know it isn't ideal but what can I do to make it better?
ReplyDeleteI always forget about white balance. Thanks for the reminder!!! I take hundreds of photos of children a week, so this is so helpful :).
ReplyDeleteWhite balance is the best. Glad to help!
DeleteHow can I do out of the box photography?
ReplyDeleteIn consideration to anything, be it focus, views, angles, lights, poses, etc.
I would be glad to get some tips from you.
You have changed my life with the explanation about white balance!!! Thank you!! Everything is perfectly explain and really helpfull!
ReplyDeleteIt changes your life for real, doesn't it?!? Photos are so much better just by correcting the color, it's amazing. Glad to hear it was helpful and easy to understand, that's what I'm hoping for!
DeleteThanks so much for the great post!
ReplyDeleteThanks for reading!
DeleteAbsolutely LOVE this! Helped me a bunch :) Im so used to using ambient lighting outdoors, so when it came time to do an indoor shoot, I was lost! This definitely cleared it up!
ReplyDeleteGlad to help!
DeleteHi there, I just found this and thank you for writing it. I am in the process of starting my own photography business im an amature and still learning alot about poses and how to take good indoor pictures of something other than my kid just being cute lol. If you have any tips or advice or anything you think is helpful please email me or add my business on facebook. http://www.pinterest.com/pin/220535712972422588/ thank you thank you thank you!!
ReplyDeleteThis was awesome, and the refresher I needed! I do photog and plan to go more in the 'life style' direction, so hello INDOORS! I have the Nikon d3000 after having a Canon Rebel t3 and I think my Nikon sucks at taking indoor shots! :( I kinda think I fudged something up a long time ago without knowing and googled how to reset but to no luck. Anywho, I've strayed away from a lot of your fab pointers...time to get back to them! Any hints on a slow/blurry/yucky/no triggering flash Nikon is appreciated! HAH!
ReplyDeleteThanks for taking the time to do this post right, with good/bad examples and all! To add to the orangeness of my indoor photos is the fact that we have a lot of wood-paneling in our home... yikes. All of my indoor photos have been deleted They look like we live in a pumpkin.
ReplyDeleteI am with you in trying to avoid the flash at all costs (in fact, it is lost at the moment, but that is another story). But I have not had success compensating for it well, and I had no clue what the white balance feature on my camera does. I relied solely on slow shutter speeds to trade darkness for blur. I look forward to experimenting with it now.
Thanks for clear and concise info that is easy to understand. I am doing a family picture for a friend at her home. It will be done at night, inside. I have a basic home studio lighting kit, however have not yet had a lot of time to experiment with lighting set ups. Any suggestions for how to best light the area to give a soft overall look? Thanks
ReplyDeleteI've just come across your blog and really enjoyed it. I find it amazing the amount of time you obviously give helping people with their problems and doubts. Simple, easily understood explanations. I'm a little lost for words.
ReplyDeleteI think this was one of my favorite comments ever. I love to help people, share what we've learned, and make everyone feel like we're on the same level, so this was a huge compliment. Thanks David!
DeleteExcellent tips! Thanks so much...I am a novice with my DSLR, but am anxious to try out your suggestions!
ReplyDeleteGlad to help, thanks for reading!
DeleteHi there I was going through your post and couldnt find where you had said what kind of camera you have and lens I may have skipped over it :) ty
ReplyDeleteI didn't mention that :) I was planning on doing a post on that in the future, but haven't got to it yet. I'm sure all of these were taken with my Canon 50mm 1.4/f lens, on a Canon EOS 5D Mark II, which actually is no longer being made since the Mark III came out last year. Excellent camera, but I'm sure new technology every year is only making new models better!
DeleteThank you for your easy to understand tips. I'm looking forward to checking out your other recommendations. I shoot photos for our fire department. Day, night, inside, outside, you never know so I'm always looking for good advice.
ReplyDeleteKyle, that's awesome! What a great work to do, shooting photos for the fire department! Sounds like much more intense photography than me getting my kids to sit still :) Good luck, and I'm glad I could be of help!
DeleteThank you so much for posting this! It is so helpful. I am shooting my first indoor lifestyle session tomorrow and was looking for some great tips. This post helped so much! I appreciate you posting it! Thanks especially for the photos on the blog, they helped a ton!
ReplyDeleteGreat tips! I already changed my AWB and it does make a huge difference! I'll have to work on the clutter another day, haha
ReplyDeleteMy two.cents...
ReplyDeleteWhite balance you can set a.manual white balance by taking a sheet of whit computer paper fill your frame and and take a.shot doesnt have to be in focus.. the choose manual white balancr it will then pull.up photos select your.sheet of paper will adjust to correct white balance as long as you stay in the same light
For those having issues with things out of focus make sure your set to one shot and not al servo ect... that means the camera is choosing where to set focus.. ie an arm instead of face... you.can then toggle your focus point the little red dots should light up on your view finder place selected dot on subject push shuttee button half down and it will focus them press all the way down to take shot...
I also recommend setting up your focus to back button google it :)
I
I was curious how can one get a great shot of someone who has to wear glasses, esp indoors. Seems to always have a glare of light whether flash or natural lightig and you can't see their beautiful eyes. I have a couple of grandchildren that have to wear glasses due to lazy eye and it would be great to capture their beautiful eyes behind their glasses.
ReplyDeleteAnonymous, I hear you! Glasses make it tough, for sure. I still try to focus on the eye through the glasses, but that is hit or miss, since the camera typically thinks I'm trying to focus on the glasses. I would say natural lighting for sure, since flash will almost guarantee a glare, then play around with what they're facing when you're taking the picture. If it is not direct sunlight (meaning you can't see the sun streaking across the floor in the shape of your window), then I think you'll have a better shot at reducing glare. But if it's still prominent, try turning them away from the window slightly and see if that helps. Sometimes it's just the angle you're taking the shot from, you could try having them stay in the same place, but you just move around until the glare is gone. I wish I could be of more help, it's definitely tricky. Be creative and I think you'll come up with something!
Deletehello! I just love your pictures! am a beginner in photography. tell me one thing. these are the pictures taken as it is from the camera or it has been retouched? did you take them in raw format or JPEG? Thanks a lot for the tips!
ReplyDeleteHi Suraj! Thanks for stopping by! We've been on a bit of a sabbatical so I apologize for the delay in responding :) For the purposes of my role in this blog, teaching everyday photography to everyday people (like me!), I really wanted to keep it simple. So none of these have been edited or retouched. And I take everything in JPEG because with two photographers in the home and the amount of photos we take, we simply don't have the file space for raw files. And we like the challenge of shooting on JPEG and just working with what you have to get it right, instead of depending on RAW to allow us to fix our mistakes later. I know arguments go both ways for which is best, JPEG is just what works for us. Good luck!
DeleteGreat post! It was really helpful how you did the side by side demonstration of what you were talking about. :)
ReplyDeleteErin - beingerin.com
Glad I could help Erin! I'm a visual person, so side-by-sides work well for me too. Glad to hear I'm not the only one! :) Enjoy!
Delete