

It's not much of a secret that I am a sucker for the Goodwill, I love it. I love the thrill of the treasure hunt. I get a rush when I find something truly spectacular. There was a time in my life that I wouldn't have been caught dead in a thrift store (cough cough, high school). I remember the time my mom and sister took me to Savers and I literally got a rash from freaking out for even being in the store.
Now I walk in with purpose. At the peak of my thrift store addiction I was going three times or more a week. I have curbed that quite a bit and make it only once or twice every few weeks now. This past week as I was walking the aisles of my local Goodwill (which they have been remodeling and organizing) I found four teak bowls. I immediately snatched them up and whisked them home.
They are great as they are, but I thought it would be fun to jazz them up with a touch of paint. Doesn't paint make most Goodwill finds that much better? Imagine the possibilities with these, Mother's day gifts, teacher appreciation, you could use them as a planter if you seal the inside of the bowl as well! Jewelry holder, spare change in your laundry. The possibilities are limitless.
Supply List:
Wood bowls (any size)
Craft paint
Tape
Scissors
Paint brushes
Craft paint
Tape
Scissors
Paint brushes


Step 2: Lay out your tape. You could go with one pattern for all the bowls, but I wanted them to all be unique, so I mixed it up a bit.
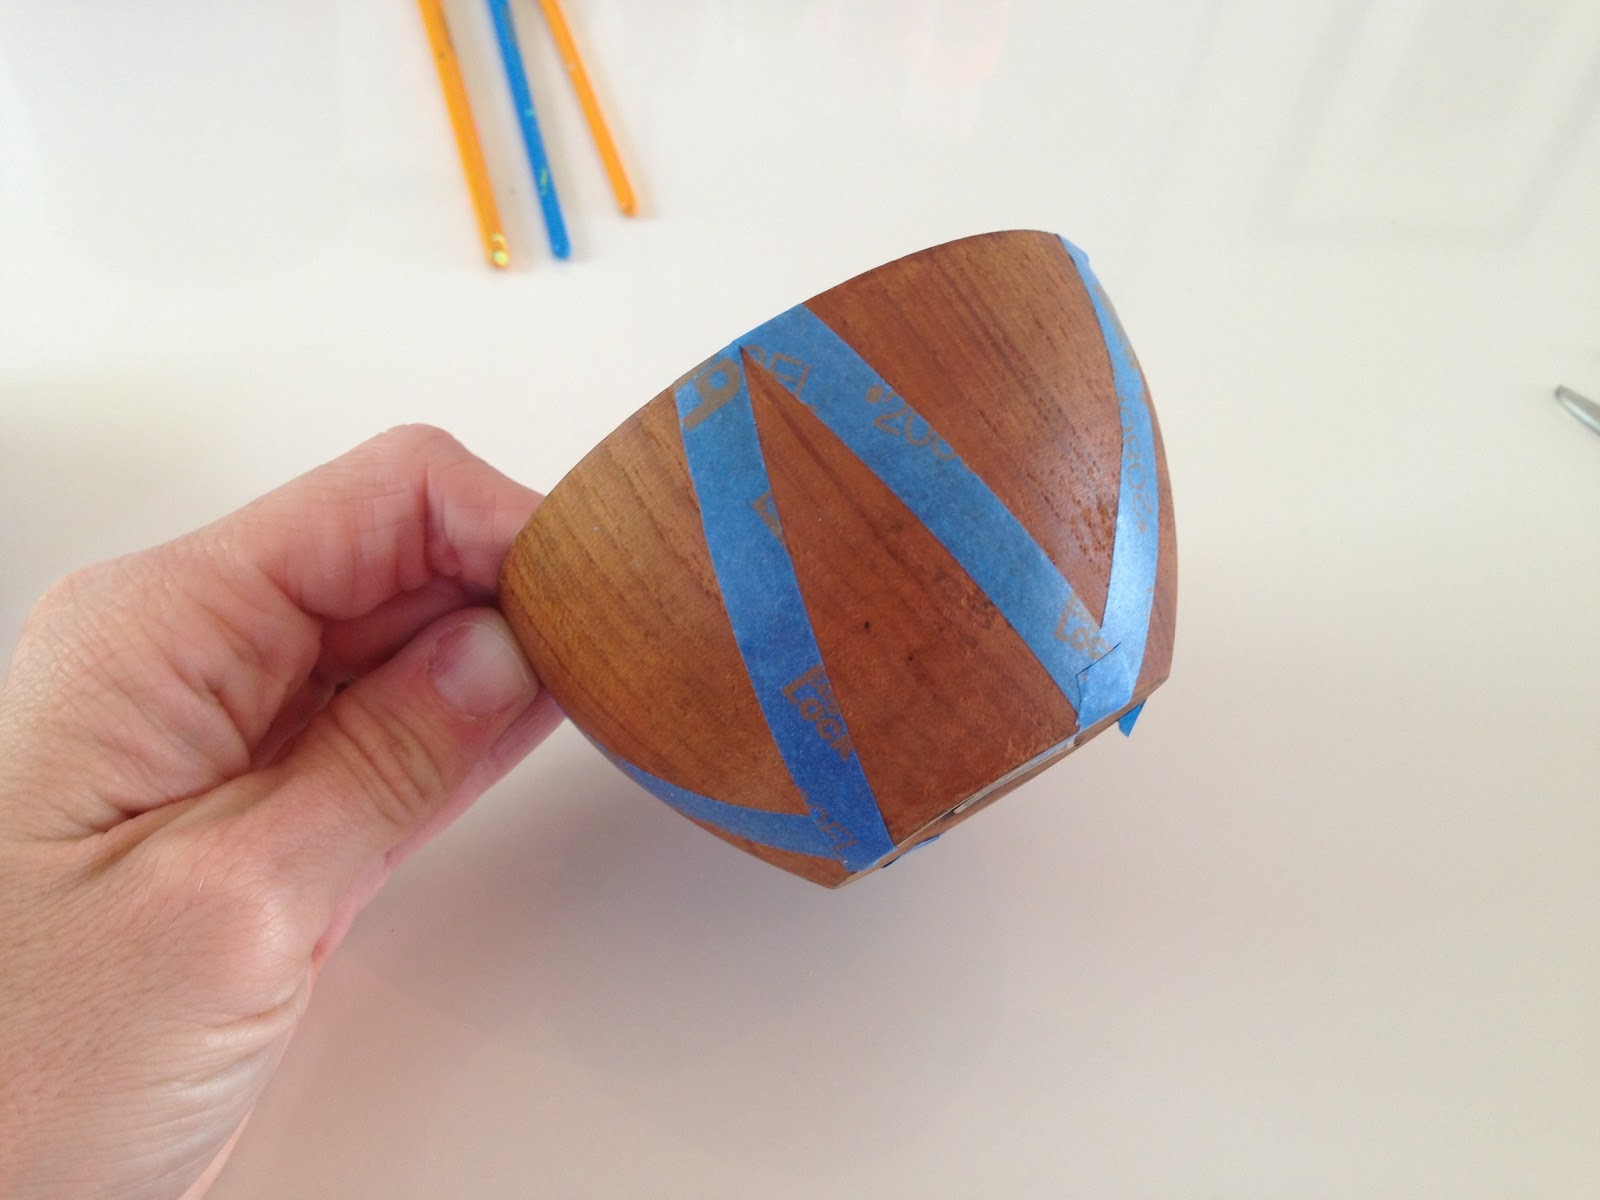
For this one I just put tape on at crazy angles.

Step 3: Sand the bowl a bit. I couldn't find my sandpaper so I just used my trusty nail file. (Seriously, I need to by sandpaper.)

Step 4: Start painting. I have learned that some paints are better than others and require only 2 coats, some take 12 (I'm looking at you Lime Green My Studio Acrylic Craft Paint).


Step 5: Remove the tape and admire your work! At this point reassess and see if you need to add any more paint. I am not in love with the polka dot one, I used a sponge sponcer and the paint dried kind of bubbled.

These are NOT dishwasher safe -but no wood bowls are:) Hand wash with care!

Thanks for stopping by and stay tuned for my next post on May 6th. I'll give you a hint—it's for Teacher Appreciation Week and includes a free printable from our incredibly talented sponsors at 1012 Designs. Get excited!
julie
this post has been shared at:
The Shabby Nest, Jennifer Rizzo, Tatertots and Jello, Be Different Act Normal, Six Sisters Stuff, i heart naptime, Flamingo Toes, skip to my lou, Craft-o-Maniac, so you think you're crafty

I want to come eat a salad in these. Someday. Someday.
ReplyDeleteWe'll leave the light on;)
DeleteI love these! I need to hit the thrift soon. My favorite is the Antique Mall down the street from my house.
ReplyDeleteGlad you approve! I was quite pleased with how they turned out!
DeleteThose are SUPER cute.
ReplyDeleteThanks so much! and thanks for taking the time to comment!
DeleteVery cute! I picked up some wooden bowls at the thrift store recently, too, and have been trying to figure out what to do with them. something like this might be just what they need :)
ReplyDeleteLet me know if you do! I love that you can always find them at the Goodwill, its almost a guarantee!
DeleteJulie you are amazing! I LOVE these!
ReplyDeleteThanks so much! and I think you are pretty great as well:)
DeleteThese are just darling! I am a huge fan of neon with wood and you pulled it off perfectly! Thanks oh so much for sharing some thrifting inspiration :) {Found you through the Flamingo Toes link party -- I'm your newest follower!!}
ReplyDeleteHi Jess! I am such a crazy fan of neon, I am so glad that its on trend again! I will definitely check out your blog! Thanks for following!
DeleteThese are gorgeous, love the colours against the wood!
ReplyDeleteThanks! I wasn't really sure how they would turn out but end up quite pleased with them;) Thanks for your comment!
DeleteOhmygoodness! They look great... I have a set of wooden bowls in my cabinets. Trying this effect is so tempting!
ReplyDelete- Lora
Thanks so much for commenting, and definitely let me know if you decide to paint your bowls! I would love to see how they turn out!
DeleteThese are awesome! I'm loving the geometric style.
ReplyDeleteI'll be keeping an eye out for cheap, plain bowls
Love this idea. I have about 12 thrifted wooden bowls, some I've already upcycled, but I have a few left that I'm excited to try this on!
ReplyDeleteJulie, I want to display these in my kitchen! So fun and bright!!! Great job!
ReplyDeleteI would love for you to share this at my link party, On Display Monday!
http://craftandrepeat.wordpress.com/2013/05/06/on-display-monday-link-party-1/
I hope to see you there!
Have a happy week!
Brianna
I adore these!! They'd make a great (and cheap!) project for a new apartment. Thanks for the inspiration :)
ReplyDelete