

Auto does a pretty good job.
Auto means you're letting your camera guess the exposure you want for each shot. And for the most part, it's a pretty remarkable feature. Your camera is really smart. And if it's easier for you, and more fun for you to stress less about settings, then roll with it!
If you find yourself getting stuck though, or you're constantly wondering "how do I get my pictures to look like that?" when looking at other photography, then there's something you should know: you are smarter than your camera.
Pretty awesome, right? That means if you understand what is affecting your exposure, you can decide exactly how you want to expose every shot. It was a big day for us when we discovered that. It was so nice to be able to CONTROL our own exposure and actually get our shots to turn out the way we wanted them to. Hopefully I can give some tips that will make your discovery a lot quicker than our teach-ourselves, hit-and-miss, read-lots-of-books-we-didn’t-understand-yet, and search-every-online-forum-and-tutorial method. :)
So let's get to it.
Exposure is light recorded into your camera. Easy enough. There are three key exposure settings that determine how light is recorded into your camera, so this Exposure Series will be done in three parts: aperture, shutter speed, and ISO. These make up "The Exposure Triangle." I know it sounds like a lot of big words and there will be lots of numbers thrown around...but stay with me! Getting this will be huge! Each setting in your Exposure Triangle equally affects your exposure, or how light/dark your photo will be.
Today we're tackling aperture.
(see part 2 on shutter speed here)
 What is aperture?
Aperture is the size of the opening in the lens when a picture is taken. It opens to let in more light and closes to let in less light. It's like a big eyeball that squints when it's too bright and dilates when it's dark, or at least it should when exposing correctly :) The larger the hole or aperture (also called an f-stop), the more light will hit your sensor. The smaller the hole or aperture (f-stop) the less light will hit your sensor.
Here's a curveball for you, though. It would make sense that a larger number should mean a larger opening, but no such luck. The f-numbers are fractions, so actually, the larger the f-number, the smaller your aperture becomes. The lower the f-number, the bigger your aperture becomes and the more light comes in through the lens. How's that for inconvenient? Check out the chart below to see how much the opening of the lens changes with each f-stop. It's crazy!! I would never have thought it would be that big of a difference. (The bolded f-numbers are those that are most common. If your camera won't let you go down as low as f/1.4, f/2, f/2.8, your camera's not messed up, it's just as low as your lens will go. You can read up on my lens post for more info.)

Aperture also controls depth of field and affects the lighting of your exposure. Depth of what?! No worries, that's where we're headed next. You can't talk aperture without talking depth of field, folks.
What is depth of field?
Depth of field is the amount of your subject that is in focus. An image with a very small depth of field (created with large, *and usually more expensive* apertures) have a lot of dreamy, melted foreground/background with only one segment of the image in focus—see image on the left—while an image with a very large depth of field (created with small apertures) would have everything in focus—see image on the right. The blur (not to be confused with motion blur) created when things are out of focus because of a large aperture/small depth of field is also known as bokeh.
 Self-indulging tangent...I may daydream about bokeh, and you may remember my confession
here
of loving large apertures to a fault for that very reason. It's a style
choice and completely a personal opinion, but I like to think of it
more as better story telling—allowing the part to be seen that you want
to be seen, and forgetting the rest that dilutes the story. Plus...it's
beautiful. Just sayin.' :) My lens post has more info on lenses and tips on which can help you get the smallest depth of field and best bokeh.
Self-indulging tangent...I may daydream about bokeh, and you may remember my confession
here
of loving large apertures to a fault for that very reason. It's a style
choice and completely a personal opinion, but I like to think of it
more as better story telling—allowing the part to be seen that you want
to be seen, and forgetting the rest that dilutes the story. Plus...it's
beautiful. Just sayin.' :) My lens post has more info on lenses and tips on which can help you get the smallest depth of field and best bokeh. Mmmmm, yummy bokeh.

In English, please...
Here is a series of photos taken from the same spot with different apertures. You can see as the aperture gets smaller (and f-stop # gets larger), more of the background comes into focus.

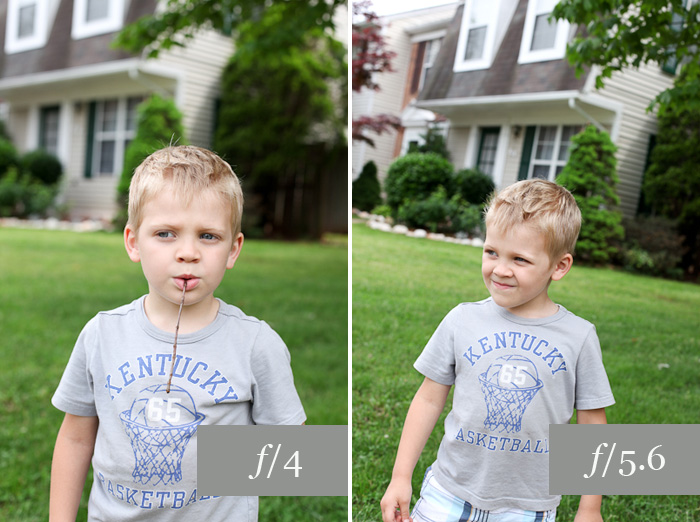
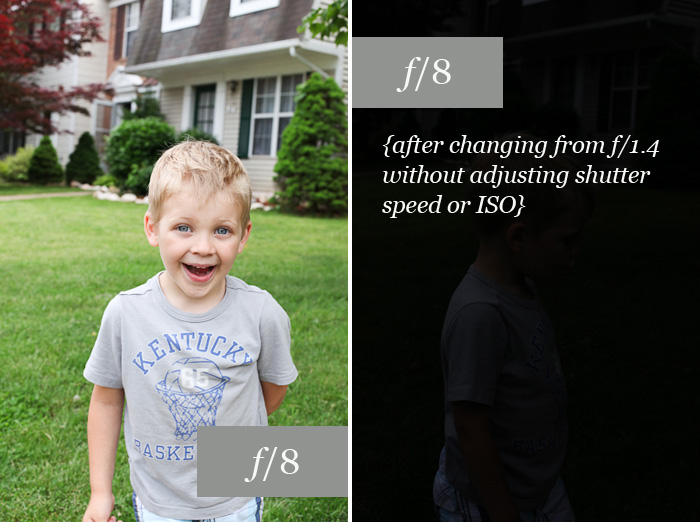
What you CAN'T see, is that with each decreased aperture size, I had to compensate the loss of light by boosting my other exposure settings (shutter speed in this case...that post comes next).
Making your aperture smaller and bringing more into focus will ALWAYS mean a darker photo...UNLESS you compensate for it somehow. See the last image? The black one? Yep. That was to show you, in all its glory, what happened when I went from f/1.4 to f/8 without adjusting my shutter speed or ISO. If you're shooting on Aperture Priority (Av for Canon, A for Nikon), your camera should be making those adjustments for you. In manual mode, it's up to you. But we'll cover that in parts 2 and 3 of the series, so don't panic. Baby steps. Let's rock photography one mind-blowing technique at a time.
Remember these 3 things.
- Aperture is the opening of your lens.
- The smaller the number the larger the opening.
- Larger openings let in more light and have a smaller area of focus (more blur/bokeh/awesomeness).
Switch to your aperture priority setting and stay there this week (Av for Canon, A for Nikon). Mess around with aperture sizes and see how it affects your shots. Get the hang of f-stops and a feel for how much will be in focus for each one (try comparing your shots with f/2.8, f/4, f/5.6, f/8, f/11).
Good luck! And let me know if you have any questions!

Thanks Melissa! Is that your house in the background? So dreamy! Love it!
ReplyDeleteIt's not my house in the background, but it is my neighborhood :) It's so fun seeing you here!
DeleteYes! Thank you for this post. It will be very helpful to me. I am going to bookmark it so I can refer to it often :). The way you laid the information out was simple but helpful and it included enough information to whet my appetite. Can't wait to play more with bokeh :)
ReplyDeleteThanks so much for stopping by and commenting Lauren! I'm sooooo so so glad it will be helpful for you. This is the stuff that was so over my head when we started, and I was frustrated by the learning curve and we didn't really have anyone help us out with that, so I love being able to help others. I'm so glad to hear it came across as simple but helpful, I'm always unsure of how the info's coming across, so that makes me feel better :) And yes! Play with more bokeh!! Good luck!
DeleteYou are amazing. Great post. I love a lot of bokeh too! I feel like it is more realistic, more like the way our eyes see things.
ReplyDeleteM, I totally agree! Depth of field is totally just simulating what our eyes would do to focus on something and ignore the rest, I love that you see it that way. Maybe that's why it's such a consistent favorite of mine (and yours!). Thanks for commenting, it makes me happy :)
DeleteYou make it sound so easy... I have a hard time taking good pictures and I try to follow all the post I read about it but still... I'll try your tips! Thanks!
ReplyDeleteI know! The learning curve is huge, and I have frequently had to remind myself that photography is a skill, one that must be practiced over and over and over just like any other skill. I think point-and-shoots gave all of us the impression that photography just requires a camera and the ability to click the shutter button, and sometimes that's completely true, but to go more in depth with a DSLR takes more than that. And it's hard! And totally overwhelming! It takes work, and it takes time while working at it to have all the pieces come together and click, but it will come. With time and practice, it will totally come! You can do it! :)
DeleteI love these tips! As usual, you are amazing. One question: how do you take control of your camera (i.e. take it off auto) and still capture the moments that seem so fleeting? I feel like when I take it off auto, I am too busy fumbling with the camera to catch anything good... and by the time i get the camera right, the moment has passed.
ReplyDeleteI hear you Rachel! Especially when little ones are involved, shooting on manual can make it a big challenge to catch the moment before it's over. For this, I have some suggestions, which I think I'll be putting into a post at the end of the exposure series, putting it all together. But the best brief tip I can give you would be your Aperture Priority setting. It's a nice partial-manual setting that will allow you to change your aperture with one button, and the camera will adjust the rest of your exposure for you. That allows you to get the versatility of nailing the aperture you want (which is most important to me, personally), but save you some serious time by dealing with the rest for you. You could just leave it on the aperture size you know you want, and it will be ready at any time. I hope that helps!
DeleteFound you through Pinterest! Love this post---so simple to understand, now I just need to practice :) Looking forward to parts 2 and 3, thank you.
ReplyDeleteThanks so much Carey! Part 2 will be next week, and part 3 a couple weeks after that. Practice is key! I'm so glad the post was simple and understandable, that's my goal! Practice up, and be sure to come back for the rest! :) I'm sure you'll have it down sooner than you think!
DeleteWould so love for you to write a book! I need one to carry around with me. You're just delightful and your tips are SUPER helpful. Thank you!!!
ReplyDeleteKim
You are so sweet Kim! I would love to come up with something you can carry around with you :) That's been a goal Jon (my other half) and I have had for years, and hopefully it will come to fruition soon enough! Stay tuned over the next year :) And I'm so happy we can help, nothing makes us happier.
DeleteThank you so much for these tips! I have been reading your blog and walking around my house practicing!!! I just got a Canon Rebel T3i for my Birthday and I want to learn how to take awesome pictures!!! Your blog is now my bible :) !!!!
ReplyDeleteJaclyn, I'm so excited my posts have been helping you! Practice is the very best thing you can do, so you're spot on. Shoot, shoot, shoot, and the more you do, the better your shots will be, and the more sense your camera will make to you. Be sure to check out Exposure Part 2, and Part 3 will be coming this Friday! Good luck, keep up the practice, and let me know if there is anything specific you'd love to see a post on!
DeleteAre you all in KY?!? I know that most people outside of here would not wear a UK shirt....lol. Love it! GO BIG BLUE! BBN!
ReplyDeletei found your post thru pinterest..up to this moment i didnt have a clue how pinterest could help me but it has...thank you for your information you are the bomb!
ReplyDeleteI don't know how many books I have read or how many classes I have taken and never has it been explained so "plain english" like. Thanks so much for the help, this makes a huge difference!
ReplyDeleteThanks, Iiona
http://virginlewisfamily.wordpress.com/2013/08/04/sunset-in-mississippi/
You just do no understand how much I needed to find your blog!! Thank you so much for taking the time to explain such complicated things into layman's terms for those of us who want to use our DSLR camera's for its potential, yet not have to get a degree in photography to do so!!! I cannot thank you enough for all the help your blog was for me!! And.. your family is BEAUTIFUL!! :)
ReplyDeleteah thank you so much for these write ups!! I have only recently got my DSLR, and sometimes I think the logic flies over my head at times. You explain everything so beautifully.
ReplyDeleteI am sure I will be back quite often! :-) THANK YOU
I have read countless "for dummies" books and such, but your article was worded so perfectly for me that things I've been struggling to understand became clear....where have you been all of my photography life?!
ReplyDeleteTHANK YOU
ReplyDeleteTHANK YOU
THANK YOU.
I don't know why but my brain doesn't want to learn the technical side of photography, so I count on AUTO. I get some really gorgeous shots but I know I could do better with a little help!
I have bookmarked your blog and I'm starting RIGHT HERE with my tutorials!
THANK YOU
THANK YOU
THANK YOU!
LOL
Karen
Hello Melissa, i've been searching for tutorials a long time ago, and none of the information i found was helpful. I'm glad i found you, you have wonderful ideas, and your explanation is so simple.
ReplyDeleteI have a Canon PowerShot SX130 IS... do you think i can have the same results as you? I'm not an expert, i just love taking pictures of anything xD